If you’ve worked with Magento 2, you’ve probably come across the term controller. Controllers are the entry points for handling requests in Magento. They decide what happens when a user visits a certain URL.
In this blog, I’ll walk you through how to create a custom controller in Magento 2, step by step.
What is a Controller in Magento 2?
In Magento 2, a controller is a PHP class responsible for handling requests and returning responses. For example:
- Visiting
example.com/customer/account/logintriggers a Login controller. - Visiting
example.com/checkout/carttriggers the Cart controller.
Controllers live inside modules and typically:
- Receive the request.
- Execute some logic.
- Return a response (HTML, JSON, redirect, etc.).
Step 1: Create a Custom Module
Before creating a controller, we need a module. Let’s call it Ecommet_HelloWorld.
Create the folder structure:
app/code/Ecommet/HelloWorld/Add registration.php:
<?php
use Magento\Framework\Component\ComponentRegistrar;

ComponentRegistrar::register(
    ComponentRegistrar::MODULE,
    'Ecommet_HelloWorld',
    __DIR__
);
Add etc/module.xml:
<?xml version="1.0"?>
<config xmlns:xsi="http://www.w3.org/2001/XMLSchema-instance"
        xsi:noNamespaceSchemaLocation="urn:magento:framework:Module/etc/module.xsd">
    <module name="Ecommet_HelloWorld" setup_version="1.0.0"/>
</config>
Enable the module:
php bin/magento setup:upgrade
php bin/magento module:status Ecommet_HelloWorld
Step 2: Create the Controller File
Magento controllers follow this path:
app/code/Vendor/Module/Controller/{RouteName}/{ActionName}.phpFor our example:
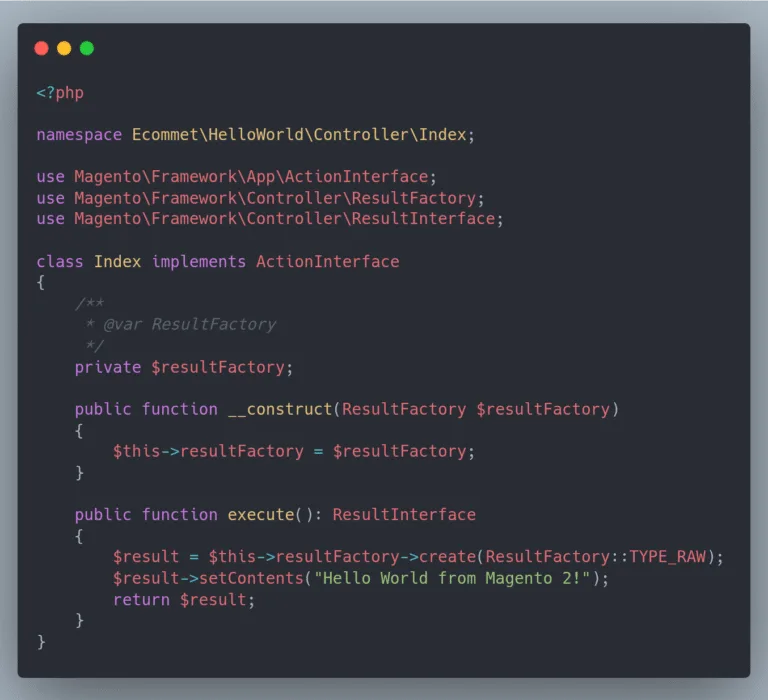
app/code/Ecommet/HelloWorld/Controller/Index/Index.phpCreate Index.php:
<?php
namespace Ecommet\HelloWorld\Controller\Index;

use Magento\Framework\App\ActionInterface;
use Magento\Framework\Controller\ResultFactory;
use Magento\Framework\Controller\ResultInterface;

class Index implements ActionInterface
{
    /**
     * @var ResultFactory
     */
    private $resultFactory;

    public function __construct(ResultFactory $resultFactory)
    {
        $this->resultFactory = $resultFactory;
    }

    public function execute(): ResultInterface
    {
        $result = $this->resultFactory->create(ResultFactory::TYPE_RAW);
        $result->setContents("Hello World from Magento 2 (ActionInterface)!");
        return $result;
    }
}
Magento recommends using controller interfaces:
Magento\Framework\App\ActionInterface– Generic controller (works for all HTTP methods).Magento\Framework\App\Action\HttpGetActionInterface– For GET requests.Magento\Framework\App\Action\HttpPostActionInterface– For POST requests.
Step 3: Define a Route
Now, we need a route that maps the URL to our controller.
Create file:
app/code/Ecommet/HelloWorld/etc/frontend/routes.xml<?xml version="1.0"?>
<config xmlns:xsi="http://www.w3.org/2001/XMLSchema-instance"
xsi:noNamespaceSchemaLocation="urn:magento:framework:App/etc/routes.xsd">
<router id="standard">
<route id="helloworld" frontName="helloworld">
<module name="Ecommet_HelloWorld"/>
</route>
</router>
</config>Here:
id="helloworld"– Route ID.frontName="helloworld"– Appears in URL.
Step 4: Access Your Controller
Now flush the cache:
php bin/magento cache:flushOpen the browser and visit:
http://yourdomain.com/helloworld/index/indexYou should see:
Hello World from Magento 2 Controller!Step 5: Types of Responses
Magento controllers can return different response types:
- Page Result (renders a layout + template):
$resultPage = $this->resultFactory->create(ResultFactory::TYPE_PAGE);
return $resultPage;- Redirect Result (redirect to another URL):
$resultRedirect = $this->resultFactory->create(ResultFactory::TYPE_REDIRECT);
$resultRedirect->setUrl('/customer/account');
return $resultRedirect;- JSON Result (useful for APIs / AJAX):
$resultJson = $this->resultFactory->create(ResultFactory::TYPE_JSON);
$resultJson->setData(['success' => true, 'message' => 'Hello JSON!']);
return $resultJson;